
This article will discuss interfacing DHT22 sensor and Arduino, but if you are here to find out about failed to read from the DHT22 sensor error, click on the link to go to the section directly.
- What are the DHT11 and DHT22 Sensors?
- What are the applications of the DHT22 Sensor?
- How to use it with the Arduino?
- What are the connections to be made?
- Installing Libraries
- Programming with Arduino and DHT22 sensor!
- Output and Demonstration
- Troubleshooting
- No Such Directory Error and it’s Solution
- Failed to read from the DHT22 Sensors
- Conclusion
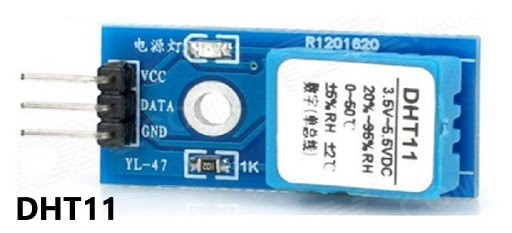
What are the DHT11 and DHT22 Sensors?
The DHT11 and DHT22 sensors are used to measure temperature and relative humidity. These are very popular among makers and electronics hobbyists. These sensors contain a chip that does Analog to Digital conversion and spits out a digital signal with the temperature and humidity. This makes them very easy to use with any microcontroller.
The DHT22 sensor has a better resolution and a wider temperature and humidity measurement range. However, it is a bit more expensive, and you can only request readings with an interval of 2 seconds. Despite their differences, they work in a similar way and you can use the same code to read the temperature and relative humidity.
What are the applications of the DHT22 Sensor?
Some applications of DHT22 sensor are:
1.Temperature sensing
2.Relative humidity
3.Heat index
How to use it with the Arduino?
The DHT22 and Arduino are connected through a single wire connection. It is a simple connection and can be coded easily to obtain the desired output.
What are the connections to be made?
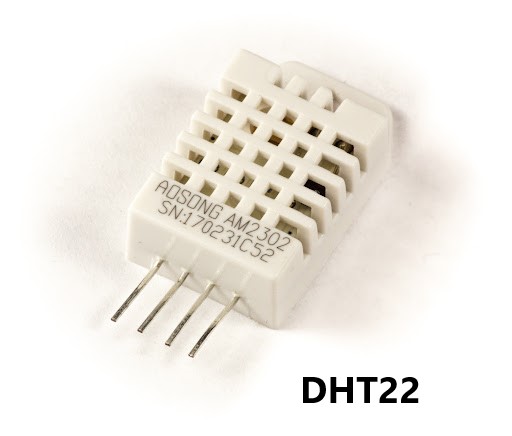
The DHT22 sensor comes in two different types and they are:
a) DHT22 sensor with 4 pins
b) DHT22 sensor with 3 pins.
If the DHT22 has 4 pins, then
Pin 1 – VCC or +5v
Pin 2 – Data or output pin
Pin 3 – NC (no connection)
Pin 4 – Ground
If the DHT22 has 3 pins, then
Pin 1 – VCC or +5v
Pin 2 – Data or output pin
Pin 3 – Ground.
Let us consider the DHT22 sensor with 3 pins, for now, then we can have a reference of the figure given below and observe the connections made for the temperature sensor using the DHT22 and Arduino Uno.
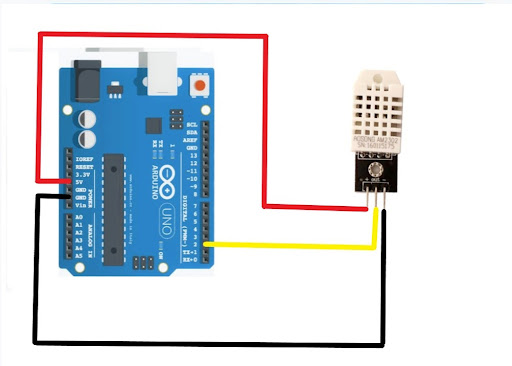
Here we can observe that a pull-up resistor is connected between +5v, output pin and the Pin 2 on the DHT22 sensor. This is not required as there is an inbuilt pull up resistor present in the Arduino Uno.
After completing all the connections as shown above, we connect the USB Port on the Arduino Uno to the PC/Laptop.
Installing Libraries
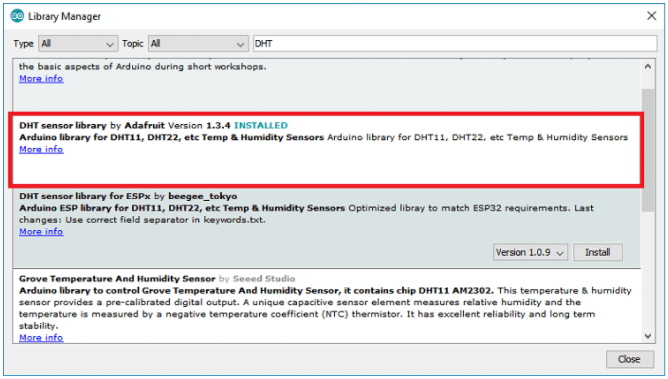
For installing drivers open Arduino IDE and go to Sketch > Include Library > Manage Libraries. The library manager should open.
Here search for ’DHT’ and install the DHT library from Adafruit.
Programming with Arduino and DHT22 sensor!
Example sketch for testing DHT humidity/temperature sensor
Requires the following Arduino libraries:
DHT Sensor Library: https://github.com/adafruit/DHT-sensor-library
Adafruit Unified Sensor Lib: https://github.com/adafruit/Adafruit_Sensor
#include "DHT.h"
#define DHTPIN 2     // Digital pin connected to the DHT sensor
// Feather HUZZAH ESP8266 note: use pins 3, 4, 5, 12, 13 or 14 --
// Pin 15 can work but DHT must be disconnected during program upload.
// Uncomment whatever type you're using!
//#define DHTTYPE DHT11   // DHT 11
#define DHTTYPE DHT22   // DHT 22  (AM2302), AM2321
//#define DHTTYPE DHT21   // DHT 21 (AM2301)
// Connect pin 1 (on the left) of the sensor to +5V
// NOTE: If using a board with 3.3V logic like an Arduino Due connect pin 1
// to 3.3V instead of 5V!
// Connect pin 2 of the sensor to whatever your DHTPIN is
// Connect pin 3 (on the right) of the sensor to GROUND (if your sensor has 3 pins)
// Connect pin 4 (on the right) of the sensor to GROUND and leave the pin 3 EMPTY (if your sensor has 4 pins)
// Initialize DHT sensor
DHT dht(DHTPIN, DHTTYPE);
void setup()
 {
    Serial.begin(9600);
    Serial.println(F("DHTxx test!"));
    dht.begin();
}

void loop()
{
   // Wait a few seconds between measurements.
   delay(2000);
   float h = dht.readHumidity();
   // Read temperature as Celsius (the default)
   float t = dht.readTemperature();
   delay(100);
   // Read temperature as Fahrenheit (isFahrenheit = true)
   float f = dht.readTemperature(true);
   // Check if any reads failed and exit early (to try again).
   if (isnan(h) || isnan(t) || isnan(f))
   {
      Serial.println(F("Failed to read from DHT sensor!"));
      return;
   }
  // Compute heat index in Fahrenheit (the default)
  float hif = dht.computeHeatIndex(f, h);
  // Compute heat index in Celsius (isFahreheit = false)
  float hic = dht.computeHeatIndex(t, h, false);
  Serial.print(F("Humidity: "));
  Serial.print(h);
  Serial.print(F("%  Temperature: "));
  Serial.print(t);
  Serial.print(F("°C "));
  Serial.print(f);
  Serial.print(F("°F  Heat index: "));
  Serial.print(hic);
  Serial.print(F("°C "));
  Serial.print(hif);
  Serial.println(F("°F"));
}
Output and Demonstration
Now that we are done with writing the code, we will verify/compile the code by clicking on the tick button on the left corner on the top of the Arduino IDE screen. Once the code is compiled, we will click on the upload button that is right next to the compile button. By clicking this we will be uploading the code onto the Arduino Uno.
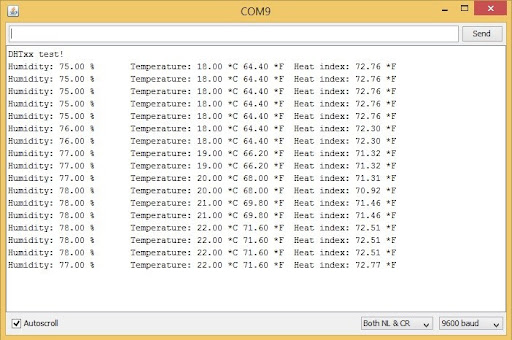
After uploading the code to the Arduino, open the Serial Monitor at a baud rate of 9600. You should get sensor readings every two seconds. Here’s what you should see in your Arduino IDE Serial Monitor.
Troubleshooting
a) NaN error and its solution
If your DHT sensor returns the DHT readings as “Nan”, then there are some possibilities that you have gone wrong in one or more points as shown below:
Wiring
When you’re building an electronics project, you need to double-check the wiring or pin assignment. Always verify and validate your connections, if it still doesn’t work, continue reading the next troubleshooting tips.
Power
The DHT sensor has an operating range of 3V to 5.5V (DHT11) or 3V to 6V (DHT22). If you’re powering the sensor from a 3.3V pin, in some cases powering the DHT with 5V solves the issue.
Power Source
As mentioned in the previous tip, your Arduino might not be supplying enough power to properly read from the DHT sensor. In some cases, you might need to power the Arduino with a power source(External adapter, etc.) that provides more current.
Bad USB port or USB cable
Sometimes powering the Arduino directly from a PC USB port is not enough. Try to plug it to a USB hub powered by an external power source. It might also help to replace the USB cable with a better or shorter one. Having a USB port that supplies enough power or using a good USB cable often fixes this problem.
Sampling rate
The DHT sensor is very slow getting the readings (the sensor readings may take up to 2 seconds). In some cases, increasing the time between readings solves the problem.
DHT sensor is damaged
Unfortunately, these cheap sensors sometimes look totally fine, but they are fried/broken. So, even though you assembled the right circuit and code, it will still fail to get the readings. Try to use a different sensor to see if it fixes your problem.
Wrong baud rate or failed to upload
If your Arduino IDE Serial Monitor is empty, double-check that you’ve selected the right baud rate, COM port or that you’ve uploaded the code successfully.
Sensor type
Double-check that you’ve uncommented/commented in your code the right sensor for your project. In this project, we are using the DHT22.
No Such Directory Error and it’s Solution
There’s also a common error that happens when you try to compile the code. If you receive the following error:
fatal error: Adafruit_Sensor.h: No such file or directory
#include <Adafruit_Sensor.h>
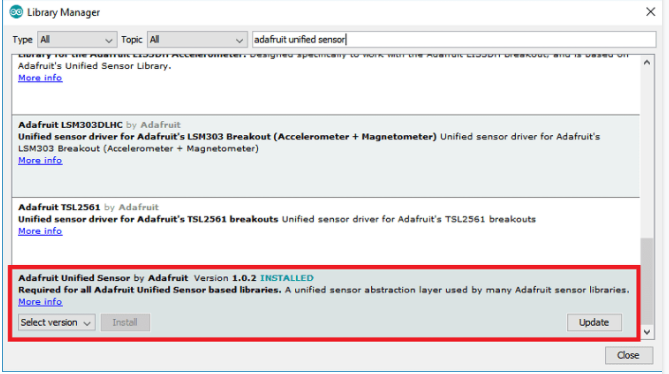
Then you need to install the Adafruit Unified Sensor driver library. In your Arduino IDE search box, type in “Adafruit Unified Sensor“, scroll all the way down to find the library and install it.
After installing the library, restart your Arduino IDE and the code should compile without the error message.
Failed to read from the DHT22 Sensors
If this error keeps popping up every 2 seconds on the serial monitor as shown below

1. Go to the DHT_sensor_library folder from the File Explorer ie., Documents\Arduino\libraries\DHT_sensor_library
2. In DHT_sensor_library, you will be having two files .cpp and .h files
3.Open the .cpp file with any text editor.
4. Go to line 250, and change the delay value from 1 to 2 ms.
5. Then go to line 257, and change the delay microseconds value from 1100 to 2200.
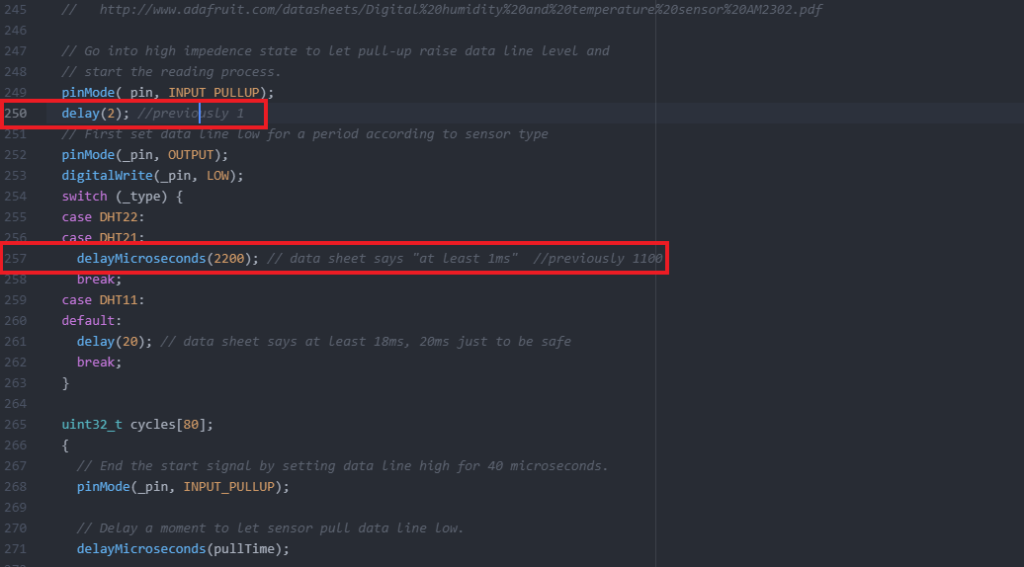
6. After this is done, save the file and close it.
7. Recompile the code and upload it to the board. Now, the output to the TEMPERATURE SENSOR USING DHT22 AND ARDUINO UNO is displayed on the serial monitor.
Conclusion
To conclude with the topic, the DHT11 and DHT22 sensors provide an easy and inexpensive way to get temperature and humidity measurements with the Arduino. The wiring is very simple – you just need to connect the DHT data pin to an Arduino digital pin.
[/et_pb_text][/et_pb_column]
[/et_pb_row]
[/et_pb_section]